Paint the Cow Town!
or
Detailing and modifying an ERTL Cow Town set
The ERTL Cow Town set was only produced
by the ERTL toy company for a few years, and has been out of production
since 1998. Fortunately, it turns up on ebay on a regular basis, and you
can pick one up at a reasonable price. I was lucky enough to rustle up
my ERTL toy set for only $40 on ebay a year or two ago. I believe Murphy
got his for less than $30.
Now, one of the things that make this toy set so wonderful for gaming
is that it is almost perfectly in scale for 25mm miniatures.Oh, and did
Imention that they have removable roofs? You couldn't make a better gaming
set if you had tried! In addition to the shipping with three great buildings
(saloon, sheriff’s office, and barn/livery stable), it comes with
a small stagecoach, a buckboard, and lots of great Western town props.
This set can really add a lot to your gaming table.
Now, I’ve used the stagecoach and buckboard almost from the instant
I got the set. But, as for the buildings… Well, I’ve gotta
admit that I’ve been dilly dallying with them, just doing a little
touch up of paint here or there whenever I felt like it. Ya see, I’ve
got a lot of other buildings to make my Western towns, so I wasn’t
in desperate need to use them, so I’ve allowed them to languish,
half-finished, around my gaming table. However, I’m finally getting
off my hind quarters and am going to finish them before OwlCon in February
2006.
In the meantime, here are some “in progress photos” to show
what I’ve done and where I’m going with these.
Mike Mitchell
Nov. 28, 2005
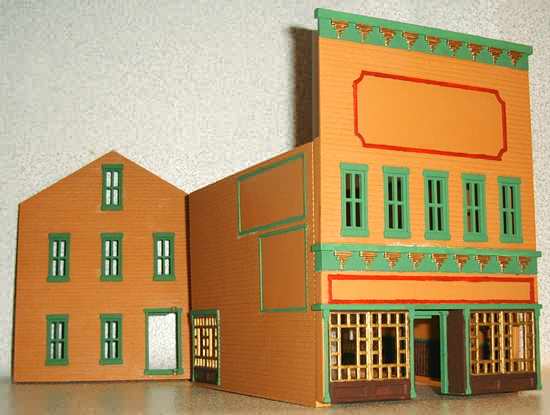
The Saloon
The ERTL buildings are made of colored plastic; they vary from set to
set, I’ve seen some saloons that were gray, but mine is a nice warm
brown. Since I liked the color, I decided to keep it. However, the whole
building is a single color and that’s rather plain, so I decided
to paint the trim to liven it up. Now, buildings in the old West were
actually often painted bright, vivid colors. At least this is true in
the more prosperous, larger towns. This was particularly true of saloons
and dance halls. The paint at that time was often whitewash or thin and
did not stand up to the rigors of time and harsh weather, which is why
it washed off and, in ghost towns, we see only pale boards and bare wood.
These remnants of those bygone times have colored our expectations, which
is why Hollywood and TV tend to use muted colors; it would just look weird
to us to see bright, festive colors.
I’ve seen a lot of scratch-built Western town that actually do
use “historically accurate” bright blues and vivid greens
for buildings. Personally, I don’t like ‘em. My games are
more pulp fiction than history, so I prefer to keep my towns looking more
like Hollywood backlots than the real world of that time. So, my buildings
are usually dull wood or simple earth-tone colors. As you can imagine,
I use a lot of browns when I paint buildings. Of course, there are a LOT
of shades of brown, and I use them to keep my towns from looking too dull.
Now, with the ERTL Cow Town saloon, I decided to go a bit wilder than
usual. I liked the base wall color of the buildings, but decided to go
bold with painting the trim and details.
I started by washing the buildings in Dawn dishwashing liquid and let
them soak for about 20 minutes to lift all the oil and residue from the
plastic. I let them air-dry overnight and then I taped off the top edge
of the false front and the bottom edge. I used masking tape and newspaper
to protect the rest of the building and then applied a coat of white primer.
I was originally going to paint these areas red and I was worried about
how the paint would look on the brown base color. It turns out I needn’t
have worried, nor should I have bothered with this step. The acrylic paint
I used provided adequate color saturation in two or three coats. I also
changed my mind about the red: with the green, it just looked too “Christmasy,”
if you know what I mean. I wound up painting over the red with the same
green I used on the window trim.
UNDER CONSTRUCTION
Green, dark brown, red, and two types of gold. This is a might-side fancier
than most other buildings than your cowpokes have seen back on the ranch!
Note that there are spaces on the building to place stickers. They are
a bit cartoonish, so I will probably create some new ones.
As for the windows and doorframes, I started painting directly on the
plastic (no primer). This turned out to be the best approach. I did use
masking and transparent tape to help with the straight lines, but I was
getting too much seepage under the tape and wound up using an Xacto knife
scrape away the paint where it had leaked under the tape onto the plastic.
I’ve since decided that taping isn’t worth it and now I just
take my time to do it by hand.

SHAPING UP
I also painted the interior of the building. I think the dark paneling
at the bottom is a nice touch, and I may cut some shiny mylar plastic
to fit a "mirror" in that green frame. Also, note the slots
and tabs on the wall edges: these are used to snap the building together. |
I actually used two types of gold
paint on this. The windows are a basic gold acrylic. They have a
nice shine to them, but look like painted wood. The gold décor
on the trim, and on the interior oil lamps, however, is done with
liquid gold leaf. This is an enamel-based paint that provides a
stunning shine and looks like real metal. I love working with liquid
leaf, although it does require mineral spirits as a thinner and
brush cleaner.
The liquid leaf does pose a problem, though. Previous experience
has shown that I can’t use spray clear coat because it causes
the liquid leaf to “melt” and run. So, when I seal it,
I will have to use another type of sealant, like Future floor polish.
|
More to come!

|
