
Adventures with Milliput!
or
Getting to first base with your miniatures
As promised, here are some quick photos to chronicle my
first attempts at using Milliput
epoxy to sculpt new bases for some of my Wild West miniatures. Milliput
is a heavy-duty epoxy that is shipped in two, rolled cylinders; it is
activated when mixed and will air harden in a few hours. I believe this
is an industrial grade epoxy and it is probably a lot more durable that
I need. But I had it on hand, so I decided to use it to try adding a little
style to the bases.

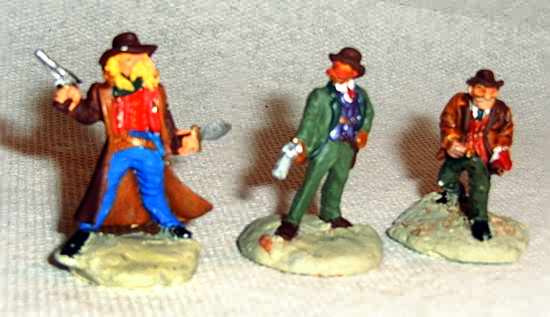
BEFORE - JUST BASIC BASES
As you can see, the miniatures were already painted and based on pennies
or washers. (Sample photo from the "Love
& Bullets" adventure played at Little Wars in 2003.)
Day One - Mixing the putty and sculpting
the bases
Yuck! What a mess. First of all, I started with WAAAAAY
too much! About an inch of each color. I wound up throwing half of it
away.
I decided to use the standard gray/green Milliput. I read
the directions and it suggested that I knead it with water on my hands
to cut down on the adhesion. It got so tacky that I actually had to knead
it under a small stream of tap water. It took a LONG
time to get to a smooth consistency. I wound up crumbling it a bit and
working the crumbs together.
Then I had a big problem with getting it between the legs
of the painted minis. I'm going to have to touch up some spots where it
stuck to the mini and where, on unsealed minis, it lifted the paint off
when it touched. I think next time I won't try to retro-fit this on the
minis – I'll add it to the primer or perhaps even the bare metal
prior to primering.
Ahhh, the shaping! That was a combination of fingers, the
X-acto blade, and the handle of a small paint brush. That was a bit of
a pain. I finally stopped trying to work the Milliput between their legs
and focused on building up around the bases (metal washers) and the bases
of the miniatures. I also had to keep wetting my fingers and adding a
little water to keep it pliable. Hopefully this won't affect the stability
of the epoxy...
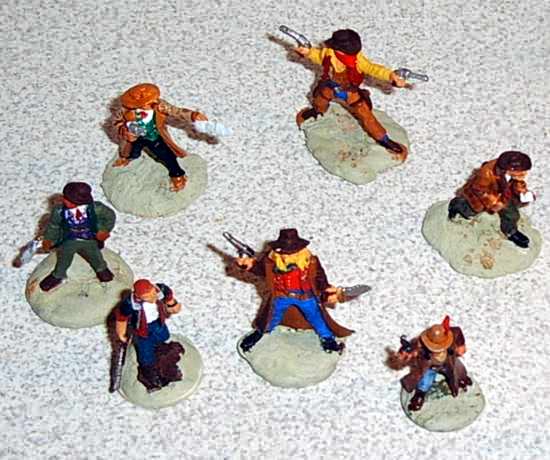
FIRST BASE
It was very difficult to work the putty between the legs. It’s very
sticky and can pull the paint off the figure. If it does stick, it’s
better to just leave it and chip it off when dry, or just paint over it.
Note the little dot of Milliput on the knee of the figure to the right.
There is also a small dab on the bottom of the duster on the figure to
the left.
I got 11 bases done before calling it quits. I guess it only took about
40 minutes once I got the stuff kneaded and ready to work. Then I remembered
that I wanted to work some talc into them. I had it all ready but was
so focused on the sculpting that I forgot it. I did push some grains into
some bases, just to give them a slightly different texture, but I don't
think it will really matter.
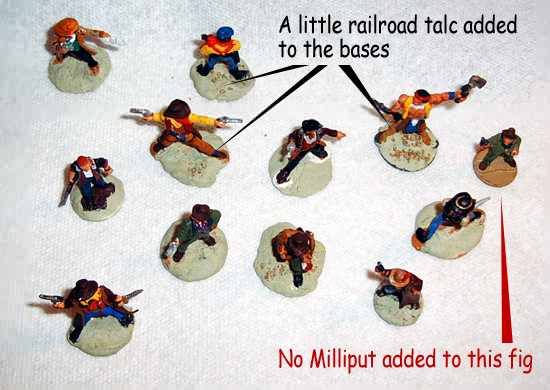
THE TWELFTH MAN
Once the epoxy was mixed, it took about 40 minutes to do 11 figures. I
made a lot of bumbling errors (it’s my first time) and I know I’ll
improve with experience. At the last minute I remembered to push some
talc into some of the bases, just to give them a little texture. In this
photo I included one figure with its original base, just to show the contrast
between them.
A CLOSER LOOK
I strongly suspect one of the last bases I did is not really adhering
to the mini with the birght yellow shirt – I suspect it'll fall
off later after dries. We'll see. Also, note that two figures on the bottom
row have "stripes" between their legs. The man with a shotgun
and the Indian bounty hunter (bottom left and right, respectively) were
some of the later minis I based, and I found it easier to just work the
epoxy up to fill the space between the washer and their own base. In short,
I didn't try working the putty between their legs because I didn't want
it to stick to their paint.
Day Two - Painting the bases
After the Milliput hardened overnight, I came back to paint
them. This was very easy (as you can see, I mostly did a flat coat that
closely matched my game table drop cloth). I did add a light wash to bring
out some details, though, and did a tiny amount of dry brushing on some
of the talc.
Speaking of the talc, it did not hold up very well - a lot
of it flaked off. I'll experiment with glue and other sealants in the
future. Yet, even where the small rocks flaked off, they left nice textured
impressions, so it really didn’t bother me very much.
Where the talc did stick, however, it looked fine.
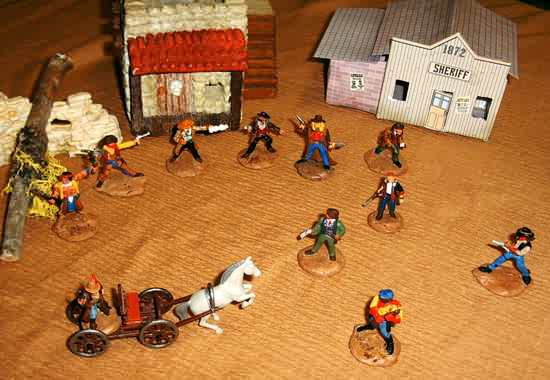
HOME BASE
All the newly based figures gather for a group shot after a rough day
of convention gaming.
All in all, it was a bit of a hassle, but it turned out
to be worth it. The extra weight improved the figures' stability, and
they all looked a lot better on the table. More "finished,"
I think. I'll post some more close-ups soon, and I may experiment with
some different epoxies or putties (perhaps something that is easier to
mix). But I definitely like the way this looks and will be doing more
of this in the future.
Mike Mitchell
June 14, 2005

| 